On February 27, 2020 my company announced a layoff (a.k.a. displacement) of 330 IT Staff and moving to an outsourcing company. Some were laid off that day. The rest were given 90 days to transfer our knowledge to our replacements. In the first week after the announcement, I went through the anger, depression, and resolve stages. I had been with the company nearly 6 years and really thought it would be "the last company I will ever work for." I decided to make the most of it and simply do my best to make the transition as easy as possible. The next three months were of diligently documenting my job, how I packaged software, my patch management process, managing ticket escalations. I even went to the extent of making "immediate Zoom meetings" and recording them to explain some of the more complicated tasks I have done over the years.
To say the least, the knowledge transfer was painful and challenging due to lack of skills, knowledge of the tools, bad network connections, and in some cases, a language barrier. Our counterparts were not prepared for the amount of knowledge that needed to be transferred. We also started working remotely in mid-March. I found that this made it a bit easier to get documentation done as there were little to no distractions. Regardless of the circumstances, I did my part to the best of my ability and have no regrets on the outcome.
My initial thought right after the layoff announcement would be that "this is the time to relocate". But then, COVID-19 happened and delayed that plan. I job hunted, but, at the time, it was half-hearted because I wasn't sure if I wanted to stay or relocate. We started working remotely in mid-March. By May, my work from home routine was set and it was working really well. My last day was May 29, 2020. My severance would last me 3 months, so there was no rush to find another job.
Once that last day happened, I decided, if anything, I would get my house in order should I decide to actually move or not. The house has been lived in for 29 years. My father worked out of the fairly large garage for mail order services. He passed away almost 5 years ago and I had not done anything except shift things around in the garage. Without having work as an excuse, it was time to get things done.
My younger brother and I started clearing out what we knew would be trash or junk into the driveway. We tore down a small fenced area in the backyard that was no longer needed. We loaded up my trailer with the fencing. We went through all the shelves of cleaning, lubrication, and solvent bottles my dad used for his business and put them in their own boxes to be taken to a recycle center. We stacked up the cans and cans of paint that was saved from when the house was being remodeled about 10 years ago. I separated latex vs. oils and popped all the latex ones, filled them with kitty litter, so they could all be dried out. My older brother came over and started rummaging through the drawers and cabinets to help identify a lot of the parts and pieces and if they were worth keeping or not.I scheduled a 10 yard dumpster to be delivered a couple days later.
When the dumpster arrived, I started it filling it with everything from the trailer and what we had piled up in the driveway. In two days, it was half-full already. We tore down shelves and cabinets that were no longer needed. My nephew, niece and her husband helped out over the next few days. My older brother had friends interested in some of the equipment and they came by to take it and help move some heavier things out of the way. By day 4, the dumpster was already full and we still had stuff to throw away. Thankfully, the dumpster company was willing to empty it and bring it back. I still had 3 days left on the rental.
My feet aching from the multiple trips in and out of the garage, three new shelving units were installed, a workbench cleared and relocated, a heavy metal cabinet was emptied and moved. We were now able take down everything from the loft in the garage and go through all of that. A good chunk of it was empty boxes saved should they needed for shipping. It ended up being two truckloads of broken down boxes that I took to the recycle center. There was even a third row seat that came out of a minivan we hadn't owned for 20 years. Only a fraction of what was in the loft went back up, mostly holiday decorations. We were again able to completely fill the second dumpster by pick up day.
In the aftermath, the questionable chemicals were disposed of properly and another family friend was invited to see if he wanted anything we were able to find/salvage. Three more fairly large items were taken out of the garage as a result.
I'm now at the point of organizing the piles of stuff we are keeping or putting up for sale. Aside from all that's already been done, I still have a storage unit to go through as well. A third dumpster will likely be needed.
A few days ago, my best friend arrived in her RV. These last few days have been actual "vacation" days since I stopped working. This weekend, I will get back to finishing up the garage and tackling my storage unit. There will then be a yard sale. Whatever doesn't sell, I'll give away or throw away.
Once that it is done, the job hunt will be my focus. It's been almost a month already and I'm ready to start working again. At this point, I'm hoping for a remote position. I'll be attending webinars and training on AWS and Google technologies and maybe manage a few certificates.
This first month flew by. The next two will probably go even faster. :-)
Thursday, June 25, 2020
Wednesday, November 4, 2015
Java 8 Deployment with SCCM 2012 and PowerShell App Deployment Toolkit
OVERVIEW
This is an updated version of my original Java post from last year. This applies to Java 8 only. Oracle has made some slight changes to Java 8, but the package itself is nearly the same.
PowerShell App Deployment Toolkit
If you don't know about it, there's a nice little bundle of PowerShell scripts and configuration files that give you tons of options that can be useful. It's called the PowerShell App Deployment Toolkit.
https://psappdeploytoolkit.codeplex.com/
A couple of people put this together and it's a perfect toolkit to use if you are trying to deploy software where certain applications must be closed before they can install. They include a very easy guide to follow and get you started. Do not be daunted that this is all PowerShell based, especially if you don't know or feel comfortable with PowerShell. It's pretty simple to use and example scripts/scenarios are provided. The bonus is that you don't have to rely on a deployment tool such as SCCM. It can be run as a stand-alone package.
This has worked on Windows XP on up without having to upgrade PowerShell on XP systems, but it's something to consider if Windows XP is still in your environment. The highest version XP supports is PowerShell 2.0.
Review the App Deployment Toolkit documentation. Pay special attention to the examples provided. You can adjust some of the default behaviors set in the .XML files. In my environment, I modify the AppDeployToolkitConfig.xml file in the AppDeployToolkit folder and change the default path for the logs (<Toolkit_LogPath> and <MSI_LogPath>).
Build the Package
I create a folder for the package. In this case, the root folder is called 8Update65. Following the user App Deployment Toolkit guide, I copied the folder structure from the App Deployment Toolkit within the 8Update65 folder:

NOTE: The Config folder is NOT part of the Application Deployment Toolkit. It can be ignored.
I then downloaded the latest Java version to a temp folder on my test machine. While you can use the .EXE file as it is, it's a little bit easier, in my opinion, to extract and use the .MSI file. To do that, start the install, but don't do anything beyond the Welcome screen. Once at the Welcome screen, open up Windows Explorer (My Computer) and browse to:
C:\Users\[UserName]\AppData\LocalLow\Sun\Java\[Java_Version] (where [UserName] is your user name and [Java_Version] is the version that was downloaded)
There will be one file...the .MSI. Copy it into the Files folder as shown from the screenshot above, then cancel out of the Java install.
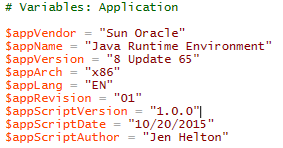
Go to the 8Update65 folder, right mouse click the Deploy-Application.ps1 file and choose Edit. PowerShell ISE should launch. Enter the relevant information in the # Variables: Application section. Some of the information is shown in the dialog boxes during the deployment.
Again, using the guide, determine the tasks and setting you want to do for each section (PRE-INSTALLATION, INSTALLATION, POST-INSTALLATION, and UNINSTALLATION). For this example, I'm doing the following:
PRE-INSTALLATION:
This is not going to be a silent deployment because user interaction is required. I set:
Show-InstallationProgress
I want to check to see if any browsers are running, and if they are, prompt the user to close them. I set:
Show-InstallationWelcome -CloseApps "iexplore,firefox,chrome,safari,opera" -PersistPrompt
Using the -PersistPrompt switch will make the dialog box re-appear every minute until the browsers are closed.

INSTALLATION:
This is where you set your command line for the install. Most vendors will have documentation on what switches and parameters are available.
To make the client aware of the installation progress, I set:
Show-InstallationProgress and add what I want the message box to say. Below that is the Execute-MSI command needed. Notice that I use the silent install switch "/qn". The client will see the PowerShell dialog box, NOT the Windows Installer progress bar.
For this particular package, I do not want the previous Java versions overwritten, so I also have the STATIC=1 parameter (screenshot doesn't match - use the command below the screenshot).

Execute-MSI -Action Install -Path "jre1.8.0_65.msi" -Parameters "STATIC=1 AUTUPDATECHECK=0 ALLUSERS=1 DWUSINTERVAL=120 JAVAUPDATE=0 AUTO_UPDATE=0 WEB_JAVA=1 WEB_JAVA_SECURITY_LEVEL=H WEB_ANALYTICS=0 EULA=0 REBOOT=0 SPONSORS=0 /qn"
No steps were configured in the POST-INSTALLATION section.
UNINSTALLATION
I again want to check if any browsers are running before the removal. In this case, because it is being removed most likely by choice, I set the parameter, -CloseAppsCountdown to kill the browsers after 2 minutes if the client isn't there to do or ignores the dialog box. I then go on to set the uninstall command line switches.

Note that the path is the Product ID for this particular version of Java. The Product ID will be DIFFERENT if another version of Java is being packaged. To determine the Product ID, you can install manually on a test machine, then go into the test machine registry:
Determine Product ID for other versions of Java
32-bit Systems:
HKEY_LOCAL_MACHINE\SOFTWARE\Microsoft\Windows\CurrentVersion\Uninstall
64-bit Systems:
HKEY_LOCAL_MACHINE\SOFTWARE\Wow6432Node\Microsoft\Windows\CurrentVersion\Uninstall
Do a search for Java in the Uninstall folder and a subfolder should quickly be found. This folder name is the Product ID you need for the uninstall command.
Create SCCM 2012 Application
Fire up the SCCM Console and click on Software Library in the lower left corner.

Expand Application Management. Right mouse click Applications and choose Create Application

Even though there is an .MSI, we are going to use the Deploy-Application.EXE from the App Deployment Toolkit, so choose to Manually specify the application information and click Next.

In the General Information window, set the Name, Publisher, and Software version. If you want to use this in an SCCM Task Sequence, make sure the "Allow this application to be installed from the Install Application task sequence action without being deploy" option is checked. Setting the Owner and Support Contacts is optional. Click Next when done.

Setting the Application Catalog options will depend on your environment and if you are using a company portal or not. Click Next.


The Summary will let you review your settings. Click Next to complete the build of the Application.
Before distributing content and deploying to collections, I test the install (copy the 8Update65 folder to a test machine) as a stand-alone (double-click Deploy-Application.EXE) and confirm it works as expected. Tweak settings as needed in the Deploy-Application.ps1 file and repeat testing. When satisfied with the results, remember to copy any changes back to your network source location of the package before distributing.
Once validated as a stand-alone install, you should be ready to distribute content and test the deployment to a test or pilot collection of systems.
Good luck!
This is an updated version of my original Java post from last year. This applies to Java 8 only. Oracle has made some slight changes to Java 8, but the package itself is nearly the same.
PowerShell App Deployment Toolkit
If you don't know about it, there's a nice little bundle of PowerShell scripts and configuration files that give you tons of options that can be useful. It's called the PowerShell App Deployment Toolkit.
https://psappdeploytoolkit.codeplex.com/
A couple of people put this together and it's a perfect toolkit to use if you are trying to deploy software where certain applications must be closed before they can install. They include a very easy guide to follow and get you started. Do not be daunted that this is all PowerShell based, especially if you don't know or feel comfortable with PowerShell. It's pretty simple to use and example scripts/scenarios are provided. The bonus is that you don't have to rely on a deployment tool such as SCCM. It can be run as a stand-alone package.
This has worked on Windows XP on up without having to upgrade PowerShell on XP systems, but it's something to consider if Windows XP is still in your environment. The highest version XP supports is PowerShell 2.0.
Review the App Deployment Toolkit documentation. Pay special attention to the examples provided. You can adjust some of the default behaviors set in the .XML files. In my environment, I modify the AppDeployToolkitConfig.xml file in the AppDeployToolkit folder and change the default path for the logs (<Toolkit_LogPath> and <MSI_LogPath>).
Build the Package
I create a folder for the package. In this case, the root folder is called 8Update65. Following the user App Deployment Toolkit guide, I copied the folder structure from the App Deployment Toolkit within the 8Update65 folder:

I then downloaded the latest Java version to a temp folder on my test machine. While you can use the .EXE file as it is, it's a little bit easier, in my opinion, to extract and use the .MSI file. To do that, start the install, but don't do anything beyond the Welcome screen. Once at the Welcome screen, open up Windows Explorer (My Computer) and browse to:
C:\Users\[UserName]\AppData\LocalLow\Sun\Java\[Java_Version] (where [UserName] is your user name and [Java_Version] is the version that was downloaded)
There will be one file...the .MSI. Copy it into the Files folder as shown from the screenshot above, then cancel out of the Java install.
Go to the 8Update65 folder, right mouse click the Deploy-Application.ps1 file and choose Edit. PowerShell ISE should launch. Enter the relevant information in the # Variables: Application section. Some of the information is shown in the dialog boxes during the deployment.
Again, using the guide, determine the tasks and setting you want to do for each section (PRE-INSTALLATION, INSTALLATION, POST-INSTALLATION, and UNINSTALLATION). For this example, I'm doing the following:
PRE-INSTALLATION:
This is not going to be a silent deployment because user interaction is required. I set:
Show-InstallationProgress
I want to check to see if any browsers are running, and if they are, prompt the user to close them. I set:
Show-InstallationWelcome -CloseApps "iexplore,firefox,chrome,safari,opera" -PersistPrompt
Using the -PersistPrompt switch will make the dialog box re-appear every minute until the browsers are closed.

INSTALLATION:
This is where you set your command line for the install. Most vendors will have documentation on what switches and parameters are available.
To make the client aware of the installation progress, I set:
Show-InstallationProgress and add what I want the message box to say. Below that is the Execute-MSI command needed. Notice that I use the silent install switch "/qn". The client will see the PowerShell dialog box, NOT the Windows Installer progress bar.
For this particular package, I do not want the previous Java versions overwritten, so I also have the STATIC=1 parameter (screenshot doesn't match - use the command below the screenshot).

No steps were configured in the POST-INSTALLATION section.
UNINSTALLATION
I again want to check if any browsers are running before the removal. In this case, because it is being removed most likely by choice, I set the parameter, -CloseAppsCountdown to kill the browsers after 2 minutes if the client isn't there to do or ignores the dialog box. I then go on to set the uninstall command line switches.

Note that the path is the Product ID for this particular version of Java. The Product ID will be DIFFERENT if another version of Java is being packaged. To determine the Product ID, you can install manually on a test machine, then go into the test machine registry:
Determine Product ID for other versions of Java
32-bit Systems:
HKEY_LOCAL_MACHINE\SOFTWARE\Microsoft\Windows\CurrentVersion\Uninstall
64-bit Systems:
HKEY_LOCAL_MACHINE\SOFTWARE\Wow6432Node\Microsoft\Windows\CurrentVersion\Uninstall
Do a search for Java in the Uninstall folder and a subfolder should quickly be found. This folder name is the Product ID you need for the uninstall command.
Create SCCM 2012 Application
Fire up the SCCM Console and click on Software Library in the lower left corner.
Expand Application Management. Right mouse click Applications and choose Create Application
Even though there is an .MSI, we are going to use the Deploy-Application.EXE from the App Deployment Toolkit, so choose to Manually specify the application information and click Next.

In the General Information window, set the Name, Publisher, and Software version. If you want to use this in an SCCM Task Sequence, make sure the "Allow this application to be installed from the Install Application task sequence action without being deploy" option is checked. Setting the Owner and Support Contacts is optional. Click Next when done.

Setting the Application Catalog options will depend on your environment and if you are using a company portal or not. Click Next.

The Deployment Type is where we specify the package location and command line to install. Click the Add... button.

Change type to Script Installer in the drop down menu (it defaults to Windows Installer *.msi file). Changing the type will automatically select the Manually specify the deployment type information option. Click Next.
You can use the same name as before or simply call it "Install". I chose Java 8 Update 65 - Install. No language settings are necessary. Click Next.

Browse to the location of the 8Update65 folder, then set the commands for Installation and Uninstall. I also select the "Run installation and install program as 32-bit process on 64-bit clients" because this is a 32-bit package.

We now need to add a detection rule so SCCM can confirm if the install completed successfully. Because we are using the .MSI, we can use the Product ID as the detection method. Click Add Clause...

Change the Setting Type: to Windows Installer in the drop down list. Click Browser and point to the .MSI in the Files folder under 8Update65 and click OK. The Product code: field will automatically be populated. In most cases, this will be enough, however, if clients may have a newer version already installed, this version won't be necessary. Change the rule so the version is greater than or equal to the version being deployed. This will make it so only clients with 8 Update 64 or older will get the install. Anything newer will show as Already Compliant. Click OK, then click Next.

Because we need user interaction, we want to make sure the dialog boxes appear. Therefore, it must only install when a user is logged in. This is not a profile specific application, so we can choose to Install for system (uses the SYSTEM account priviledges) as the Install behavior. Logon requirement MUST BE set to Only when a user is logged on. Installation program visibility MUST BE set to Normal. "Allow users to view and interact with the program" MUST BE checked. Setting the Maximum allowed run time and Estimated installation time is optional but good practice.

Requirements are optional. You can set things like required disk space or OS versions if you choose.

There are no prerequisites needed for Java to install, so simply click Next.

The Summary will let you review your settings. Click Next to complete the build of the Application.
Before distributing content and deploying to collections, I test the install (copy the 8Update65 folder to a test machine) as a stand-alone (double-click Deploy-Application.EXE) and confirm it works as expected. Tweak settings as needed in the Deploy-Application.ps1 file and repeat testing. When satisfied with the results, remember to copy any changes back to your network source location of the package before distributing.
Once validated as a stand-alone install, you should be ready to distribute content and test the deployment to a test or pilot collection of systems.
Good luck!
Uninstall Strings
Overview
As a software packager/patch manager, knowing how to uninstall software, and often, silently can be a nightmare. Most vendors will typically have an "Uninstall String" in the registry. This is the command used when you go to Programs and Features and click Uninstall, but those are not silent. You have to click through the uninstall wizard until it shows it is finished.
If the software was packaged as a Windows Installer package (.MSI), then adding silent switches is very simple because you use the default Windows Installer switches (typically /qn). Other packaging methods, unless the vendor has documented, it can be a guessing game (/s vs. /silent or /q vs. /quiet /u vs. /uninstall) and even then, a silent option may not even exist.
Because most software vendors create the Uninstall String in the registry, I can utilize SCCM 2012 to include this key in the Hardware Inventory (yes, Hardware, not Software). Older versions of SCCM require modification of a .MOF file, but 2012, you can add it from an existing machine. I will not go into the details of modifying the .MOF file as there are other articles out there that cover this.
For this blog, I'll be documenting the method of modifying the Hardware Inventory for SCCM 2012, then creating an SCCM (SSRS) Report where you can type in the name of the product and see if an Uninstall String exists and show that string the in the report.
Modify the Hardware Inventory - SCCM 2012
Depending on your company's configuration, you will want to modify the Client Settings that include Hardware Inventory. This is usually done with "Default Client Settings", but your environment may have several different setting profiles. Choose the one that is appropriate for your environment if Default Client Settings is not used.
In the System Center 2012 Configuration Manager Console (connected to your CAS, not a Primary), do the following:
01. Click on Administration
02. Click on Client Settings
03. Right mouse click "Default Client Settings" and choose Properties

04. Select Hardware Inventory, the click Set Classes...

05. Scroll down to Installed Applications (64) (Win32Reg_AddRemovePrograms64) or Installed Applications (Win32Reg_AddRemovePrograms)
06. If you do not see one or the other, they will need to be added. Skip to Step 08 below. Otherwise, expand both and make sure UninstallString is checked.


07. If it is already checked, then you are already collecting the inventory and can move on to creating the report. Otherwise, check the box(es) and click OK.
Depending on how often you have Hardware Inventory scheduled to run, it can take a few days to get a good amount of data. Force a Hardware Inventory to run on a few machines to verify the data is being collected and create the report.
08. To add Installed Applications (64) (Win32Reg_AddRemovePrograms64) or Installed Applications (Win32Reg_AddRemovePrograms), click the Add... button.


10. In the Search box, type Reg_Add. You should see Win32Reg_AddRemovePrograms and Win32Reg_AddRemovePrograms64. Check both of them and make sure the entire class is checked.

11. Click OK, then click OK two more times to exit out of all windows.
Depending on how often you have Hardware Inventory scheduled to run, it can take a few days to get a good amount of data. Force a Hardware Inventory to run on a few machines to verify the data is being collected and create the report.
Create the Reports
SCCM 2012 uses SSRS for report creation. Go to your SSRS server for Configuration Manager and create a new report wherever appropriate in your environment. Below are the queries for 32-Bit and 64-Bit applications.
Use the following query for 32-Bit Applications:
SELECT DISTINCT v_GS_ADD_REMOVE_PROGRAMS.DisplayName0 as 'Software Name' ,v_GS_ADD_REMOVE_PROGRAMS.Version0 as 'Software Version' ,v_GS_ADD_REMOVE_PROGRAMS.UninstallString0 as 'Uninstall String'
FROM v_GS_ADD_REMOVE_PROGRAMSWHERE v_GS_ADD_REMOVE_PROGRAMS.DisplayName0 LIKE @SoftwareName
Use the following query for 64-Bit Applications:
SELECT DISTINCTv_GS_ADD_REMOVE_PROGRAMS_64.DisplayName0 as 'Software Name',v_GS_ADD_REMOVE_PROGRAMS_64.Version0 as 'Software Version',v_GS_ADD_REMOVE_PROGRAMS_64.UninstallString0 as 'Uninstall String'FROMv_GS_ADD_REMOVE_PROGRAMS_64WHEREv_GS_ADD_REMOVE_PROGRAMS_64.DisplayName0 LIKE @SoftwareName
The 32-Bit report is likely the one that will be used the most because a majority of applications are installed as 32-Bit by default or do not have a 64-Bit version. For the @SoftwareName parameter, I set a default value of %notepad++%. This is not required, however, I set it so users that have access to the report understand the format of the search to use. The % signs are required because we are using LIKE in the query. If "=" was used, the exact name of the software would be needed instead.
Run the report to verify it is pulling data. If no data is found, make sure at least one machine has done a Hardware Inventory and try it again. Also make sure you are searching for software you know is installed on the machine. It may take a few minutes for machines to report the data and SCCM to process it so it shows in the report. As more machines report in, the report will continue to grow as well.
The results will show the Uninstall String value for every version of the software found. I export to .CSV and filter out the duplicates and use that in my package/script for uninstalls.
Thursday, July 3, 2014
Creating an SCCM Collection from a List of Users or Computers
This should work for SCCM 2007 and newer.
How often do you get a request to push software or setting change to specific list of users and computers and groan at the thought of having to create the collection for it?
I cannot tell you how many times I have searched for this solution. Someone made some great PowerShell scripts, but I couldn't always get them to work and/or it was fairly slow. (REF: http://blogs.technet.com/b/mniehaus/archive/2009/04/10/adding-members-to-a-configmgr-collection-using-powershell-v2-ctp3.aspx)
I found another way to import using a .CSV, but that, too, was a little cumbersome. That method involved using a report that pulled the SMBIOS and MAC Address information, then using Access to query against the list to create the .CSV file to import. But that only worked for Computers, not users. (REF: http://www.windows-noob.com/forums/index.php?/topic/4505-how-can-i-import-computers-into-sccm-2012-using-a-file/)
A few days ago, I found a method in a forum that simplifies this tremendously (REF: http://www.myitforum.com/forums/Can-you-import-users-into-a-collection-via-CSV-m211472.aspx):
The query to import computers is simply:
select * from SMS_R_System where name in ("computer1" , "computer2" , "computer3" , "computer4"
)
For users, you would change this to:
select * from SMS_R_User where name in ("user1" , "user2" , "user3" , "user4"
)
The trick here is how to get your list of computers or users formatted with the quotes and commas. I did this in Excel.
Copy your list of users or computers to Column A. In cell B1, enter the following:
="""" & A1 & ""","
That's equals four quotes (space) ampersand (space) A1 (space) ampersand (space) three quotes, comma, quote. Copy the formula down from B1.

I use Notepad from here, so I can copy and paste the query into SCCM later. In Notepad, write your query like this to start:
select * from SMS_R_User where name in (
Copy and paste Column B from your Excel spreadsheet and add a closing parentheses:
select * from SMS_R_User where name in ("USER1",
"USER2","USER3",
"USER4",)
Now fire up your SCCM Console. The above query is a User collection, so go there to create a new user collection.
- Give the collection a name, click Next, then choose Query Rule from the drop down list.
- Give the query rule a name, then click Edit Query Statement...
- Click Show Query Language
- Copy and paste your query from Notepad into this window.
- Click OK
- Click Next a couple more times to finish creating the collection.
- Update Membership, then Refresh after a couple minutes.
Hope that helps!
Java Deployment with SCCM 2012 and PowerShell App Deployment Toolkit
OVERVIEW
Java is such a joy, isn't it?
I won't go into the trials and tribulations of potential Java version dependencies. That's another story in itself. This is to show one possible method of deployment that may or may not for your environment.
Starting with Java version 6 Update 10, the installer, by default, will try to overwrite previous Java versions. This was due to complaints from both the user and IT communities of having "too many" versions of Java installed. Older versions of Java did not remove previous versions. Systems had the potential of having dozens of Java versions installed (a reporting nightmare) requiring manual cleanup at some point in order to more easily manage "who has what".
A new parameter called STATIC was added so that the default behavior could be changed to not overwrite and keep all existing versions.
PowerShell App Deployment Toolkit
If you don't know about it, there's a nice little bundle of PowerShell scripts and configuration files that give you tons of options that can be useful. It's called the PowerShell App Deployment Toolkit.
https://psappdeploytoolkit.codeplex.com/
A couple of people put this together and it's a perfect toolkit to use if you are trying to deploy software where certain applications must be closed before they can install. They include a very easy guide to follow and get you started. Do not be daunted that this is all PowerShell based, especially if you don't know or feel comfortable with PowerShell. It's pretty simple to use and example scripts/scenarios are provided. The bonus is that you don't have to rely on a deployment tool such as SCCM. It can be run as a stand-alone package.
This has worked on Windows XP on up without having to upgrade PowerShell on XP systems, but it's something to consider if Windows XP is still in your environment. The highest version XP supports is PowerShell 2.0.
Review the App Deployment Toolkit documentation. Pay special attention to the examples provided. You can adjust some of the default behaviors set in the .XML files. In my environment, I modify the AppDeployToolkitConfig.xml file in the AppDeployToolkit folder and change the default path for the logs (<Toolkit_LogPath> and <MSI_LogPath>).
Build the Package
I create a folder for the package. In this case, the root folder is called 7Update55. Following the user App Deployment Toolkit guide, I copied the folder structure from the App Deployment Toolkit within the 7Update55 folder:

I then downloaded the latest Java version to a temp folder on my test machine. While you can use the .EXE file as it is, it's a little bit easier, in my opinion, to extract and use the .MSI file. To do that, start the install, but don't do anything beyond the Welcome screen. Once at the Welcome screen, open up Windows Explorer (My Computer) and browse to:
C:\Users\[UserName]\AppData\LocalLow\Sun\Java\[Java_Version] (where [UserName] is your user name and [Java_Version] is the version that was downloaded)
There will be two files...the .MSI and a Data1.cab. BOTH files will be needed. Copy them into the Files folder as shown from the screenshot above, then cancel out of the Java install.
Go to the 7Update55 folder, right mouse click the Deploy-Application.ps1 file and choose Edit. PowerShell ISE should launch. Enter the relevant information in the # Variables: Application section. Some of the information is shown in the dialog boxes during the deployment.

Again, using the guide, determine the tasks and setting you want to do for each section (PRE-INSTALLATION, INSTALLATION, POST-INSTALLATION, and UNINSTALLATION). For this example, I'm doing the following:
PRE-INSTALLATION:
This is not going to be a silent deployment because user interaction is required. I set:
Show-InstallationProgress
I want to check to see if any browsers are running, and if they are, prompt the user to close them. I set:
Show-InstallationWelcome -CloseApps "iexplore,firefox,chrome,safari,opera" -PersistPrompt
Using the -PersistPrompt switch will make the dialog box re-appear every minute until the browsers are closed.
INSTALLATION:
This is where you set your command line for the install. Most vendors will have documentation on what switches and parameters are available.
To make the client aware of the installation progress, I set:
Show-InstallationProgress and add what I want the message box to say. Below that is the Execute-MSI command needed. Notice that I use the silent install switch "/qn". The client will see the PowerShell dialog box, NOT the Windows Installer progress bar.
For this particular package, I do not want the previous Java versions overwritten, so I also have the STATIC=1 parameter.

No steps were configured in the POST-INSTALLATION section.
UNINSTALLATION
I again want to check if any browsers are running before the removal. In this case, because it is being removed most likely by choice, I set the parameter, -CloseAppsCountdown to kill the browsers after 2 minutes if the client isn't there to do or ignores the dialog box. I then go on to set the uninstall command line switches.

Note that the path is the Product ID for this particular version of Java. The Product ID will be DIFFERENT if another version of Java is being packaged. To determine the Product ID, you can install manually on a test machine, then go into the test machine registry:
Determine Product ID for other versions of Java
32-bit Systems:
HKEY_LOCAL_MACHINE\SOFTWARE\Microsoft\Windows\CurrentVersion\Uninstall
64-bit Systems:
HKEY_LOCAL_MACHINE\SOFTWARE\Wow6432Node\Microsoft\Windows\CurrentVersion\Uninstall
Do a search for Java in the Uninstall folder and a subfolder should quickly be found. This folder name is the Product ID you need for the uninstall command.
Create SCCM 2012 Application
Fire up the SCCM Console and click on Software Library in the lower left corner.
Expand Application Management. Right mouse click Applications and choose Create Application
Even though there is an .MSI, we are going to use the Deploy-Application.EXE from the App Deployment Toolkit, so choose to Manually specify the application information and click Next.

In the General Information window, set the Name, Publisher, and Software version. If you want to use this in an SCCM Task Sequence, make sure the "Allow this application to be installed from the Install Application task sequence action without being deploy" option is checked. Setting the Owner and Support Contacts is optional. Click Next when done.

Setting the Application Catalog options will depend on your environment and if you are using a company portal or not. Click Next.

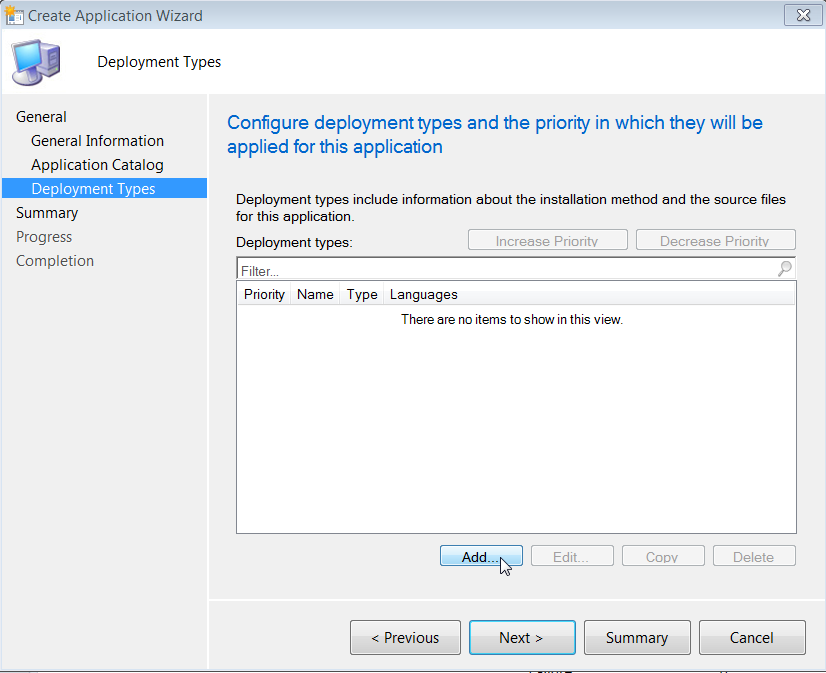


The Summary will let you review your settings. Click Next to complete the build of the Application.
Before distributing content and deploying to collections, I test the install (copy the 7Update55 folder to a test machine) as a stand-alone (double-click Deploy-Application.EXE) and confirm it works as expected. Tweak settings as needed in the Deploy-Application.ps1 file and repeat testing. When satisfied with the results, remember to copy any changes back to your network source location of the package before distributing.
Once validated as a stand-alone install, you should be ready to distribute content and test the deployment to a test or pilot collection of systems.
Good luck!
Java is such a joy, isn't it?
I won't go into the trials and tribulations of potential Java version dependencies. That's another story in itself. This is to show one possible method of deployment that may or may not for your environment.
Starting with Java version 6 Update 10, the installer, by default, will try to overwrite previous Java versions. This was due to complaints from both the user and IT communities of having "too many" versions of Java installed. Older versions of Java did not remove previous versions. Systems had the potential of having dozens of Java versions installed (a reporting nightmare) requiring manual cleanup at some point in order to more easily manage "who has what".
A new parameter called STATIC was added so that the default behavior could be changed to not overwrite and keep all existing versions.
PowerShell App Deployment Toolkit
If you don't know about it, there's a nice little bundle of PowerShell scripts and configuration files that give you tons of options that can be useful. It's called the PowerShell App Deployment Toolkit.
https://psappdeploytoolkit.codeplex.com/
A couple of people put this together and it's a perfect toolkit to use if you are trying to deploy software where certain applications must be closed before they can install. They include a very easy guide to follow and get you started. Do not be daunted that this is all PowerShell based, especially if you don't know or feel comfortable with PowerShell. It's pretty simple to use and example scripts/scenarios are provided. The bonus is that you don't have to rely on a deployment tool such as SCCM. It can be run as a stand-alone package.
This has worked on Windows XP on up without having to upgrade PowerShell on XP systems, but it's something to consider if Windows XP is still in your environment. The highest version XP supports is PowerShell 2.0.
Review the App Deployment Toolkit documentation. Pay special attention to the examples provided. You can adjust some of the default behaviors set in the .XML files. In my environment, I modify the AppDeployToolkitConfig.xml file in the AppDeployToolkit folder and change the default path for the logs (<Toolkit_LogPath> and <MSI_LogPath>).
Build the Package
I create a folder for the package. In this case, the root folder is called 7Update55. Following the user App Deployment Toolkit guide, I copied the folder structure from the App Deployment Toolkit within the 7Update55 folder:
I then downloaded the latest Java version to a temp folder on my test machine. While you can use the .EXE file as it is, it's a little bit easier, in my opinion, to extract and use the .MSI file. To do that, start the install, but don't do anything beyond the Welcome screen. Once at the Welcome screen, open up Windows Explorer (My Computer) and browse to:
C:\Users\[UserName]\AppData\LocalLow\Sun\Java\[Java_Version] (where [UserName] is your user name and [Java_Version] is the version that was downloaded)
There will be two files...the .MSI and a Data1.cab. BOTH files will be needed. Copy them into the Files folder as shown from the screenshot above, then cancel out of the Java install.
Go to the 7Update55 folder, right mouse click the Deploy-Application.ps1 file and choose Edit. PowerShell ISE should launch. Enter the relevant information in the # Variables: Application section. Some of the information is shown in the dialog boxes during the deployment.
Again, using the guide, determine the tasks and setting you want to do for each section (PRE-INSTALLATION, INSTALLATION, POST-INSTALLATION, and UNINSTALLATION). For this example, I'm doing the following:
PRE-INSTALLATION:
This is not going to be a silent deployment because user interaction is required. I set:
Show-InstallationProgress
I want to check to see if any browsers are running, and if they are, prompt the user to close them. I set:
Show-InstallationWelcome -CloseApps "iexplore,firefox,chrome,safari,opera" -PersistPrompt
Using the -PersistPrompt switch will make the dialog box re-appear every minute until the browsers are closed.
INSTALLATION:
This is where you set your command line for the install. Most vendors will have documentation on what switches and parameters are available.
To make the client aware of the installation progress, I set:
Show-InstallationProgress and add what I want the message box to say. Below that is the Execute-MSI command needed. Notice that I use the silent install switch "/qn". The client will see the PowerShell dialog box, NOT the Windows Installer progress bar.
For this particular package, I do not want the previous Java versions overwritten, so I also have the STATIC=1 parameter.
No steps were configured in the POST-INSTALLATION section.
UNINSTALLATION
I again want to check if any browsers are running before the removal. In this case, because it is being removed most likely by choice, I set the parameter, -CloseAppsCountdown to kill the browsers after 2 minutes if the client isn't there to do or ignores the dialog box. I then go on to set the uninstall command line switches.
Note that the path is the Product ID for this particular version of Java. The Product ID will be DIFFERENT if another version of Java is being packaged. To determine the Product ID, you can install manually on a test machine, then go into the test machine registry:
Determine Product ID for other versions of Java
32-bit Systems:
HKEY_LOCAL_MACHINE\SOFTWARE\Microsoft\Windows\CurrentVersion\Uninstall
64-bit Systems:
HKEY_LOCAL_MACHINE\SOFTWARE\Wow6432Node\Microsoft\Windows\CurrentVersion\Uninstall
Do a search for Java in the Uninstall folder and a subfolder should quickly be found. This folder name is the Product ID you need for the uninstall command.
Create SCCM 2012 Application
Fire up the SCCM Console and click on Software Library in the lower left corner.
Expand Application Management. Right mouse click Applications and choose Create Application
Even though there is an .MSI, we are going to use the Deploy-Application.EXE from the App Deployment Toolkit, so choose to Manually specify the application information and click Next.
In the General Information window, set the Name, Publisher, and Software version. If you want to use this in an SCCM Task Sequence, make sure the "Allow this application to be installed from the Install Application task sequence action without being deploy" option is checked. Setting the Owner and Support Contacts is optional. Click Next when done.
Setting the Application Catalog options will depend on your environment and if you are using a company portal or not. Click Next.
The Deployment Type is where we specify the package location and command line to install. Click the Add... button.
Change type to Script Installer in the drop down menu (it defaults to Windows Installer *.msi file). Changing the type will automatically select the Manually specify the deployment type information option. Click Next.
You can use the same name as before or simply call it "Install". I chose Java 7 Update 55 - Install. No language settings are necessary. Click Next.
Browse to the location of the 7Update55 folder, then set the commands for Installation and Uninstall. I also select the "Run installation and install program as 32-bit process on 64-bit clients" because this is a 32-bit package.
We now need to add a detection rule so SCCM can confirm if the install completed successfully. Because we are using the .MSI, we can use the Product ID as the detection method. Click Add Clause...
Change the Setting Type: to Windows Installer in the drop down list. Click Browser and point to the .MSI in the Files folder under 7Update55 and click OK. The Product code: field will automatically be populated. In most cases, this will be enough, however, if clients may have a newer version already installed, this version won't be necessary. Change the rule so the version is greater than or equal to the version being deployed. This will make it so only clients with 7 Update 54 or older will get the install. Anything newer will show as Already Compliant. Click OK, then click Next.
Because we need user interaction, we want to make sure the dialog boxes appear. Therefore, it must only install when a user is logged in. This is not a profile specific application, so we can choose to Install for system (uses the SYSTEM account priviledges) as the Install behavior. Logon requirement MUST BE set to Only when a user is logged on. Installation program visibility MUST BE set to Normal. "Allow users to view and interact with the program" MUST BE checked. Setting the Maximum allowed run time and Estimated installation time is optional but good practice.
Requirements are optional. You can set things like required disk space or OS versions if you choose.
There are no prerequisites needed for Java to install, so simply click Next.
The Summary will let you review your settings. Click Next to complete the build of the Application.
Before distributing content and deploying to collections, I test the install (copy the 7Update55 folder to a test machine) as a stand-alone (double-click Deploy-Application.EXE) and confirm it works as expected. Tweak settings as needed in the Deploy-Application.ps1 file and repeat testing. When satisfied with the results, remember to copy any changes back to your network source location of the package before distributing.
Once validated as a stand-alone install, you should be ready to distribute content and test the deployment to a test or pilot collection of systems.
Good luck!
Friday, March 28, 2014
Packaging IBM Data Center Client (DB2COPY1) 10.5 for SCCM
This bugger was fun. I only say that because it wasn't cut and dried like most packages are. Looking through Google, IBM doesn't have the best reputation when it comes to software deployment. My previous experience was with ClearCase and ClearQuest. Thankfully, another group handled the headache of building the scripts and answer files. I just had to dump them in SCCM.
But this one is all on me, so here's how it went.
The goal was three deployment types. One for a fresh install, one for an upgrade install, and one for development/testing purposes. The client provided a zipped up file that contained the install files and a Word doc of the step-by-step manual install instructions. After perusing the instructions, I found that the installer generates an answer file that can be used for silent installs. Wonderful! Off to Google I went for syntax and usage. I Googled for "IBM Data Server Client silent install" and the links took me straight to IBM's knowledge base. Two articles stood out. One on the command line usage of db2unins (the uninstaller) and one on where to find the sample response files. The sample files are at [InstallSource]\db2\Windows\samples. Because links change, I will not be adding any here. The Google search above should suffice. Take note, however, that using the MSI installer WILL NOT work if you want to use the response file. It doesn't recognize it!
My install answer file (PROD_CLIENT.rsp) ended up being pretty simple. You can open and edit the file with notepad. This was mine (revised 4/22/2014 to show the Extended Security option is set to No):
PROD_CLIENT.rsp File
PROD=CLIENT

LIC_AGREEMENT=ACCEPT

FILE=C:\Program Files\IBM\SQLLIB\

INSTALL_TYPE=TYPICAL


LANG=EN


KILL_PROCESSES=YES

INSTANCE=DB2

DB2.NAME=DB2

DEFAULT_INSTANCE=DB2

DB2.TYPE=CLIENT

DB2_EXTSECURITY=NO

DB2_COPY_NAME=DB2COPY1

DEFAULT_COPY=YES
I saved this file and put it in the db2\Windows folder of my install source. The uninstall answer file is necessary if you want to do a completely silent uninstall, which I did. This file is called db2un.rsp and is also in the samples folder. This was the final version of the answer file I used:
db2un.rsp File
KILL_PROCESSES = YES

REMOVE_PROD = ALL

REBOOT = NO
This file was also saved to db2\Windows in my install source.
Additional steps in the provided documentation from my client said that the services file in C:\Windows\system32\drivers\etc needed to have entries added. The entries were different between the Production install vs. the Development/Testing install. I found a vbscript via Google again that appends the services file. I made two copies of the .vbs file, one for Production and one for Development/Testing. Here is the .vbs file contents and you can see where I added my info on the iReturnValue line:
set_prod_svc.vbs File
Option Explicit

On Error Resume next


Dim fso

Dim WinDirPath

Dim PathToHosts, PathToServices

Dim iReturnValue

Const TAB = "      "

Set fso = CreateObject("Scripting.FileSystemObject")

WinDirPath = fso.GetSpecialFolder(0)

PathToHosts = WinDirPath & "\system32\drivers\etc\hosts" ' path to file

PathToServices = WinDirPath & "\system32\drivers\etc\services"


'iReturnValue = WriteToFile (PathToHosts, "127.0.0.1","localhost","","")

iReturnValue = WriteToFile (PathToServices, "[databasename]","446/tcp","","#DB2 Mainframe")


Set fso = Nothing

'--------------------------------------------------------------------------------------------------

' Description  :Function to write to file

' Return Value :1 if changes made

' 0 if file doesnt exist

'--------------------------------------------------------------------------------------------------

Function WriteToFile (ByVal pathToFile,byval para1,byval para2,byval para3,byval para4)

Dim TempFile

Dim msg


If fso.FileExists(pathToFile) Then


Set TempFile = fso.OpenTextFile(pathToFile,8,True)

msg =  para1 & TAB & para2 & TAB & para3 & TAB & TAB & para4

msg = rtrim(msg)

TempFile.WriteLine msg

TempFile.Close


Else

WriteToFile = 0

End If


End Function
Again, these two files were saved to db2\Windows on my install source.
After the install is completed, configuration of the client is required. Digging through IBM's site, they recommended creating a .bat file with your db2 commands and calling that file with db2cmd. Below is an example of my db2 configuration, which I saved as prod_db2_catalog.bat. Two other versions were made for the upgrade, which uncatalogs the old settings and sets the new ones and the other for development/testing, which used different servers. Here are the contents of my file (items in brackets will be specific to your environment:
db2 catalog tcpip node [nodename] remote [remotename] server [servername]

db2 catalog database [databasename] at node [nodename

db2 terminate

exit
One more, the files were saved to db2\Windows on my install source.
Since we have to do several tasks, I made a .cmd file to encompass all that needs to be done. Three different versions were made depending on Production, Upgrade, and Development/Testing because each called the relevant .vbs file to set the services and the relevant configuration .bat file. Here is my install_db2_prod.cmd file (revised 4/22/2014 to include applying a license):
install_db2_prod.cmd File
@echo off

Set PATH=%SystemRoot%;%SystemRoot%\system32


ECHO Append services file

"%~DP0set_prod_svc.vbs"

TIMEOUT 5


ECHO Install New Version

md C:\IBM_Install_Log

ECHO Installing...please wait...

"%~DP0setup.exe" "%~DP0PROD_CLIENT.rsp"

TIMEOUT 5


ECHO Configure Client

;Licensing

copy /y %~dp0db2consv_zs.lic "C:\Program Files\IBM\SQLLIB\BIN"

CMD /C %~dp0DB2_set_license.bat


;Database
"C:\Program Files\IBM\SQLLIB\BIN\db2cmd" %~dp0prod_db2_catalog.bat


goto exit


ECHO Completed!

:exit

exit
While the TIMEOUTS aren't really necessary, I kept them in there just in case there was a timing issue between each task. In my testing, this never occurred, but my environment had older machines out in the wild. You will notice I used %~DP0. This is necessary when calling a command or batch file in SCCM.
A license needs to be applied. It's a very simple command, which I also made into a separate batch file and called in the install file.
DB2_set_license.bat
@echo off

ECHO Set DB2 License

C:

cd "C:\Program Files\IBM\SQLLIB\BIN"

db2licm -a db2consv_zs.lic


ECHO Licensing complete!

TIMEOUT 5
One last file needed to be made for the uninstall. This was the most challenging and frustrating part of my endeavor because when you run the command as documented, an annoying message of "The system was unable to locate the file path." would occur AFTER the command completed. It made absolutely no sense, but, it also caused the script to show a failure even though there really wasn't one. While there's more than one way to address the error so that the script would continue, I set up the Deployment Type in SCCM to accept Error 1 as a "good" return code. Calling the command line in the SCCM Deployment Type would not work because it didn't like %~dp0 no matter what I tried, so I created another command file called uninstall_all.cmd. It copies the answer file to the root of C:\ and then runs the uninstall command. Here are the contents of the file:
uninstall_all.cmd File
copy /y %~dp0db2un.rsp C:\


"%PROGRAMFILES%\IBM\SQLLIB\BIN\db2unins" -y -u C:\db2un.rsp

TIMEOUT 5

goto EXIT


:EXIT

exit
This last file was also saved in the db2\Windows folder of my install source.
Now that all the files have been created and are in place, I can created my SCCM Application. Here are the steps of going through the Create Application Wizard.
- Choose Manually specify the application information and click Next.
- Enter a name for the package and any other information you wish to include. Only the name is required. The rest is optional. Click Next.
- If you use the Application Catalog feature, add the necessary information to this screen, otherwise, skip and click Next.
- At Deployment Types, click Add...
- In the drop down list next to Type: change to Script Installer and click Next.
- Give the script a name (example: Install Production) and click Next
- Browse to your source location for the files. This is typically a network location. I set this to the root of my install source location.
- Next to Installation program: click the Browse... button and locate the command file in db2\Windows you wish to use. Change to All Files (*.*) so you can see all files instead of just .exe files then find your command file. In this example, I'm using install_db2_prod.cmd.
- Next to Uninstall program: click the Browse... button and locate the command file in db2\Windows. Change to All Files (*.*) so you can see all files instead of just .exe files then find your command file. In this example, I'm using uninstall_all.cmd
- Check the box next to "Run installation and uninstall program as 32-bit process on 64-bit clients and click Next.
- In Detection Method, click Add Clause...
- Change Setting Type: to Windows Installer. Click the Browse... button and select IBM Data Server Client.msi and click OK. Click Next.
- Set Installation behavior: to Install for system. Set Logon requirement: to Only when a user is logged on. Set the Installation program visibility to your preference (I used Minimized). Check the "Allow users to view and interact with the program" box and click Next.
- I did not set any Requirements or Dependencies, so simply click Next through the last three windows and click Close when the wizard is completed.
- Back in the Create Application Wizard, click Next twice to complete the build of the Application and click Close when done.
- You are now ready to distribute the content, create your collection according to your environment, and create a deployment.
As part of my troubleshooting to get all of this working, I used PSExec on my test machine. This allowed me to modify the command files directly on the test machine without having to update content and try the deployment again. When all was done, I copied my finalized files to my install source location, then updated the content and ran all of my deployments again to validate they worked. This is the article I used:
http://blogs.technet.com/b/ryanan/archive/2013/11/06/configuration-manager-package-preparation-guide-for-app-owners.aspx
I hope this has helped you with your build and deployment of IBM Data Center Client!
Subscribe to:
Posts (Atom)