This is an updated version of my original Java post from last year. This applies to Java 8 only. Oracle has made some slight changes to Java 8, but the package itself is nearly the same.
PowerShell App Deployment Toolkit
If you don't know about it, there's a nice little bundle of PowerShell scripts and configuration files that give you tons of options that can be useful. It's called the PowerShell App Deployment Toolkit.
https://psappdeploytoolkit.codeplex.com/
A couple of people put this together and it's a perfect toolkit to use if you are trying to deploy software where certain applications must be closed before they can install. They include a very easy guide to follow and get you started. Do not be daunted that this is all PowerShell based, especially if you don't know or feel comfortable with PowerShell. It's pretty simple to use and example scripts/scenarios are provided. The bonus is that you don't have to rely on a deployment tool such as SCCM. It can be run as a stand-alone package.
This has worked on Windows XP on up without having to upgrade PowerShell on XP systems, but it's something to consider if Windows XP is still in your environment. The highest version XP supports is PowerShell 2.0.
Review the App Deployment Toolkit documentation. Pay special attention to the examples provided. You can adjust some of the default behaviors set in the .XML files. In my environment, I modify the AppDeployToolkitConfig.xml file in the AppDeployToolkit folder and change the default path for the logs (<Toolkit_LogPath> and <MSI_LogPath>).
Build the Package
I create a folder for the package. In this case, the root folder is called 8Update65. Following the user App Deployment Toolkit guide, I copied the folder structure from the App Deployment Toolkit within the 8Update65 folder:

I then downloaded the latest Java version to a temp folder on my test machine. While you can use the .EXE file as it is, it's a little bit easier, in my opinion, to extract and use the .MSI file. To do that, start the install, but don't do anything beyond the Welcome screen. Once at the Welcome screen, open up Windows Explorer (My Computer) and browse to:
C:\Users\[UserName]\AppData\LocalLow\Sun\Java\[Java_Version] (where [UserName] is your user name and [Java_Version] is the version that was downloaded)
There will be one file...the .MSI. Copy it into the Files folder as shown from the screenshot above, then cancel out of the Java install.
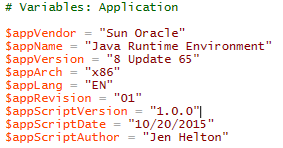
Go to the 8Update65 folder, right mouse click the Deploy-Application.ps1 file and choose Edit. PowerShell ISE should launch. Enter the relevant information in the # Variables: Application section. Some of the information is shown in the dialog boxes during the deployment.
Again, using the guide, determine the tasks and setting you want to do for each section (PRE-INSTALLATION, INSTALLATION, POST-INSTALLATION, and UNINSTALLATION). For this example, I'm doing the following:
PRE-INSTALLATION:
This is not going to be a silent deployment because user interaction is required. I set:
Show-InstallationProgress
I want to check to see if any browsers are running, and if they are, prompt the user to close them. I set:
Show-InstallationWelcome -CloseApps "iexplore,firefox,chrome,safari,opera" -PersistPrompt
Using the -PersistPrompt switch will make the dialog box re-appear every minute until the browsers are closed.

INSTALLATION:
This is where you set your command line for the install. Most vendors will have documentation on what switches and parameters are available.
To make the client aware of the installation progress, I set:
Show-InstallationProgress and add what I want the message box to say. Below that is the Execute-MSI command needed. Notice that I use the silent install switch "/qn". The client will see the PowerShell dialog box, NOT the Windows Installer progress bar.
For this particular package, I do not want the previous Java versions overwritten, so I also have the STATIC=1 parameter (screenshot doesn't match - use the command below the screenshot).
No steps were configured in the POST-INSTALLATION section.
UNINSTALLATION
I again want to check if any browsers are running before the removal. In this case, because it is being removed most likely by choice, I set the parameter, -CloseAppsCountdown to kill the browsers after 2 minutes if the client isn't there to do or ignores the dialog box. I then go on to set the uninstall command line switches.

Note that the path is the Product ID for this particular version of Java. The Product ID will be DIFFERENT if another version of Java is being packaged. To determine the Product ID, you can install manually on a test machine, then go into the test machine registry:
Determine Product ID for other versions of Java
32-bit Systems:
HKEY_LOCAL_MACHINE\SOFTWARE\Microsoft\Windows\CurrentVersion\Uninstall
64-bit Systems:
HKEY_LOCAL_MACHINE\SOFTWARE\Wow6432Node\Microsoft\Windows\CurrentVersion\Uninstall
Do a search for Java in the Uninstall folder and a subfolder should quickly be found. This folder name is the Product ID you need for the uninstall command.
Create SCCM 2012 Application
Fire up the SCCM Console and click on Software Library in the lower left corner.

Expand Application Management. Right mouse click Applications and choose Create Application

Even though there is an .MSI, we are going to use the Deploy-Application.EXE from the App Deployment Toolkit, so choose to Manually specify the application information and click Next.

In the General Information window, set the Name, Publisher, and Software version. If you want to use this in an SCCM Task Sequence, make sure the "Allow this application to be installed from the Install Application task sequence action without being deploy" option is checked. Setting the Owner and Support Contacts is optional. Click Next when done.

Setting the Application Catalog options will depend on your environment and if you are using a company portal or not. Click Next.

The Deployment Type is where we specify the package location and command line to install. Click the Add... button.

Change type to Script Installer in the drop down menu (it defaults to Windows Installer *.msi file). Changing the type will automatically select the Manually specify the deployment type information option. Click Next.
You can use the same name as before or simply call it "Install". I chose Java 8 Update 65 - Install. No language settings are necessary. Click Next.

Browse to the location of the 8Update65 folder, then set the commands for Installation and Uninstall. I also select the "Run installation and install program as 32-bit process on 64-bit clients" because this is a 32-bit package.

We now need to add a detection rule so SCCM can confirm if the install completed successfully. Because we are using the .MSI, we can use the Product ID as the detection method. Click Add Clause...

Change the Setting Type: to Windows Installer in the drop down list. Click Browser and point to the .MSI in the Files folder under 8Update65 and click OK. The Product code: field will automatically be populated. In most cases, this will be enough, however, if clients may have a newer version already installed, this version won't be necessary. Change the rule so the version is greater than or equal to the version being deployed. This will make it so only clients with 8 Update 64 or older will get the install. Anything newer will show as Already Compliant. Click OK, then click Next.

Because we need user interaction, we want to make sure the dialog boxes appear. Therefore, it must only install when a user is logged in. This is not a profile specific application, so we can choose to Install for system (uses the SYSTEM account priviledges) as the Install behavior. Logon requirement MUST BE set to Only when a user is logged on. Installation program visibility MUST BE set to Normal. "Allow users to view and interact with the program" MUST BE checked. Setting the Maximum allowed run time and Estimated installation time is optional but good practice.

Requirements are optional. You can set things like required disk space or OS versions if you choose.

There are no prerequisites needed for Java to install, so simply click Next.

The Summary will let you review your settings. Click Next to complete the build of the Application.
Before distributing content and deploying to collections, I test the install (copy the 8Update65 folder to a test machine) as a stand-alone (double-click Deploy-Application.EXE) and confirm it works as expected. Tweak settings as needed in the Deploy-Application.ps1 file and repeat testing. When satisfied with the results, remember to copy any changes back to your network source location of the package before distributing.
Once validated as a stand-alone install, you should be ready to distribute content and test the deployment to a test or pilot collection of systems.
Good luck!
This comment has been removed by the author.
ReplyDeleteThis document helped me find my way around the Powershell App Deployment kit. Great work! Thanks.
ReplyDeleteYou might also want to see this if you want a silent install, but only prompt if an app is running..
ReplyDeletehttp://psappdeploytoolkit.com/forums/topic/only-prompt-if-an-application-is-running/